
How to trim arthritic dog nails is one of the most practically challenging and most commonly neglected aspects of senior dog care, not because nail trimming is inherently complicated, but because arthritis fundamentally changes every variable that makes routine nail trimming manageable in a healthy dog. The positioning that a healthy dog tolerates easily becomes a source of real pain for a dog with inflamed, stiff, or degenerative joints. The handling that a pain-free dog accepts without protest triggers defensiveness, struggling, and fear responses in a dog whose discomfort has taught it to guard its limbs from manipulation. Understanding how to trim arthritic dog nails in a way that is genuinely safe, genuinely gentle, and genuinely effective requires approaching the entire process differently from the standard nail trimming routine, from the tools selected, to the positions used, to the session length, to the conditioning work done between sessions.
VCA Animal Hospitals’ canine arthritis management guide identifies osteoarthritis as the most common joint disease in dogs, affecting an estimated 20 percent of all adult dogs and a significantly higher proportion of dogs over 7 years of age. The American Kennel Club’s senior dog care resource confirms that nail overgrowth in arthritic dogs is one of the most frequent secondary problems that develops when routine grooming is discontinued due to the handling challenges arthritis creates, and that overgrown nails in arthritic dogs create a compounding cycle of physical harm that makes the arthritis itself measurably worse.
This guide covers the complete how to trim arthritic dog nails picture: why nail length is a critical arthritis management factor, the full toolkit of clippers, grinders, and passive alternatives, the best grinders for sensitive paws in 2026, the complete safe positioning and support protocol, the scratch pad method, and a detailed FAQ section with high-authority sourced answers.
Table of contents
- How to Trim Arthritic Dog Nails: Why Nail Length Matters More in Arthritis
- Do Long Nails Hurt Dogs With Arthritis and Why the Answer Is Critical
- How to Trim Arthritic Dog Nails: Preparation and Conditioning
- Building Tolerance Before You Begin How to Trim Arthritic Dog Nails
- How to Trim Arthritic Dog Nails: Positioning and Support
- How to Support a Senior Dog While Clipping Nails Safely
- Alternatives to Dog Nail Clippers: Tools Beyond the Standard Clipper
- The Complete Range of Alternatives to Dog Nail Clippers for Arthritic Dogs
- Best Dog Nail Grinder for Sensitive Paws 2026: Top-Rated Options
- Selecting the Best Dog Nail Grinder for Sensitive Paws 2026
- Dog Scratch Pad for Nails Pros and Cons: The Passive Alternative
- The Complete Dog Scratch Pad for Nails Pros and Cons Assessment
- How to Trim Arthritic Dog Nails: The Step-by-Step Session Protocol
- Complete session protocol:
- Frequently Asked Questions About How to Trim Arthritic Dog Nails
- Your Complete Gentle Nail Care Action Plan for How to Trim Arthritic Dog Nails
How to Trim Arthritic Dog Nails: Why Nail Length Matters More in Arthritis
Do Long Nails Hurt Dogs With Arthritis and Why the Answer Is Critical
Do long nails hurt dogs with arthritis is not a simple yes or no question; it is a question whose answer explains why how to trim arthritic dog nails is not merely a grooming task but a direct component of arthritis pain management. PetMD’s dog nail health guide confirms that when a dog’s nails are long enough to contact the ground surface during standing and walking, they exert backward pressure on the nail bed that forces the entire toe joint into an abnormal angle with each footstep.
In a healthy dog with fully mobile, pain-free joints, this pressure is an irritant that causes discomfort and gait alteration over time but does not produce acute pain. In a dog with arthritis, the same pressure amplifies the inflammatory joint pain already present, forces compensatory weight shifting that increases the load on already compromised joints, and progressively worsens the altered gait mechanics that accelerate joint degeneration. The AKC’s nail care guidance confirms that ideally, nails should not touch the ground when the dog is standing, a standard that is measurable by the simple test of placing the dog on a firm floor and checking whether nails produce an audible click during normal standing.
Do long nails hurt dogs with arthritis: the compounding cycle explained:
VCA Animal Hospitals’ arthritis progression notes identify the following compounding sequence that overgrown nails initiate in arthritic dogs: long nails force altered toe-joint angles, which redistribute weight toward the rear of the paw, which shifts loading onto the carpal and tarsal joints (wrists and ankles), which are frequently already arthritic, which increases pain in those joints, which causes the dog to reduce activity, which reduces the natural nail wear that outdoor exercise provides, which causes nails to grow even longer faster. Understanding do long nails hurt dogs with arthritis fully reveals that nail neglect and arthritis deterioration form a self-reinforcing cycle that can only be broken by consistent nail length management.
How to Trim Arthritic Dog Nails: Preparation and Conditioning
Building Tolerance Before You Begin How to Trim Arthritic Dog Nails
How to trim arthritic dog nails successfully in a dog that has developed handling resistance due to pain history requires a conditioning phase before any nail trimming attempt. The Whole Dog Journal’s cooperative care training guide identifies desensitization and counter-conditioning as the foundation of all successful low-stress grooming protocols for pain-sensitized dogs, and the approach specifically designed to rebuild the positive associations that make paw and leg handling acceptable rather than threatening.
Desensitization protocol for arthritic dogs before nail trimming:
The desensitization protocol must be completed over multiple sessions spread across days or weeks, not rushed into a single extended conditioning event that exhausts or overwhelms the dog:
- Touch conditioning (days 1 to 3): Touch the dog’s leg lightly for 1 second, deliver a high-value treat immediately, and release. Repeat 5 to 10 times per session. Progress up the leg from shoulder to elbow to wrist to paw gradually across sessions, never moving to a more distal position until the dog shows relaxed acceptance of the current position
- Paw hold conditioning (days 4 to 7): When the dog accepts light leg touching, progress to briefly holding the paw (2 to 3 seconds), treating immediately on release. The Whole Dog Journal’s hold duration guidance confirms that the hold duration should be increased incrementally across sessions, never extended to a duration that produces struggling or stress signals
- Tool introduction (days 7 to 10): Present the nail clipper or grinder tool near the paw without using it, treat immediately. Progress to touching the tool to the nail without clipping or activating, treating immediately. For a grinder, turn it on near the paw without contact, treat, before progressing to contact
- First trim session: Clip or grind one nail only. Treat immediately and end the session. This single-nail approach is the most important discipline in how to trim arthritic dog nails for previously resistant dogs; the temptation to continue when the first nail goes well must be resisted, as ending on a one-nail success builds more tolerance than a complete trim that ends in stress
Pain assessment before every session:
VCA Animal Hospitals’ pain recognition guidance confirms that arthritic dogs have high-pain and lower-pain days based on weather, activity level, and medication timing. Schedule nail trimming sessions during the dog’s best time of day (typically 1 to 2 hours after morning pain medication, when the medication is at peak efficacy) and conduct a brief informal pain assessment by gently palpating the relevant joints before beginning. If the dog shows increased guarding, flinching, or vocalization at joint palpation compared to its baseline, postpone the session to a better day.
How to Trim Arthritic Dog Nails: Positioning and Support
How to Support a Senior Dog While Clipping Nails Safely
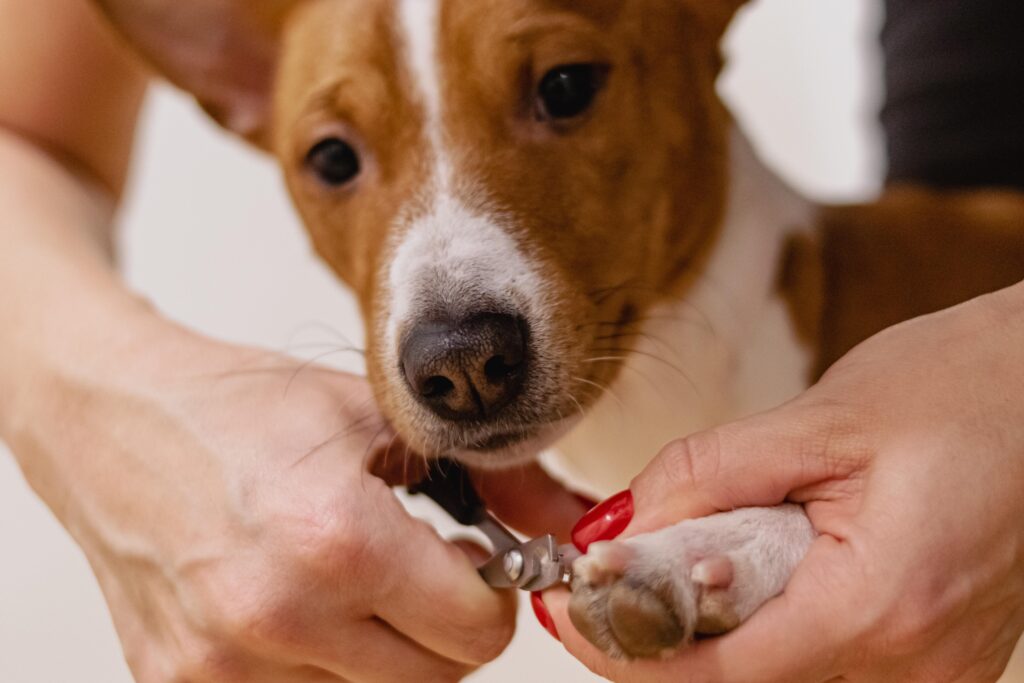
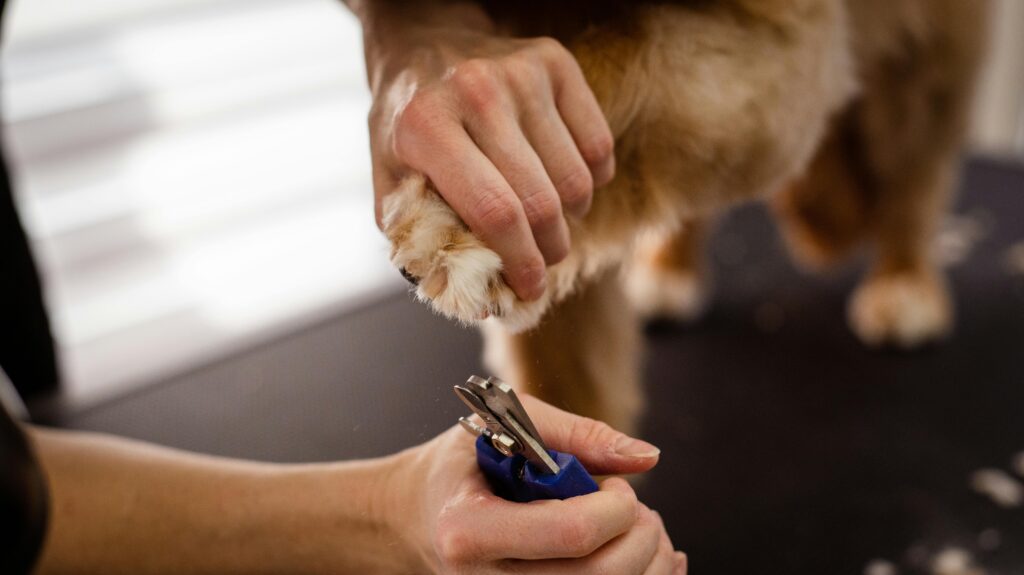
How to support a senior dog while clipping nails is the central physical challenge of how to trim arthritic dog nails and the dimension most responsible for the handling-related injuries that occur when arthritic dogs are trimmed using the same restraint and positioning approaches appropriate for young, mobile dogs.
PetMD’s nail trimming for senior dogs guidance and The Spruce Pets’ dog nail clipping position guide together identify the following as the most important positioning principles for how to support a senior dog while clipping nails:
The floor-level lateral recumbent position:
The most joint-protective position for trimming nails on a dog with widespread arthritis is placing the dog in lateral recumbency (lying on its side) on a non-slip surface at floor level. This position eliminates the weight-bearing stress on all four limbs simultaneously and removes the balance demand that standing positions impose on arthritic joints. Place a folded blanket or orthopedic dog mat under the dog for joint padding. The trimmer sits or kneels beside the dog at floor level rather than placing the dog on an elevated surface, eliminating the fall risk that an elevated grooming table represents for a dog that may startle or struggle.
The supported standing position:
For dogs whose arthritis affects primarily the rear limbs, a supported standing position with the front limbs on a low non-slip platform and the rear limbs on the ground allows front nail access with minimal joint stress. The Whole Dog Journal’s supported standing guidance recommends placing a rolled towel or small support under the dog’s chest during standing nail trims for dogs that fatigue rapidly, allowing them to partially rest their chest weight while maintaining enough stability for nail access.
The lap position for small breeds:
For small and medium dogs with arthritis, placing the dog in the trimmer’s lap in a relaxed side-lying position provides the closest physical contact and warmth that most arthritic small dogs find calming. The Spruce Pets’ small dog nail trim positioning confirms that the trimmer’s own body warmth and heartbeat proximity have measurable calming effects that reduce session stress for small dogs with pain-induced handling sensitivity.
Critical positioning rules for how to support a senior dog while clipping nails:
- Never extend or abduct the leg further than the dog extends it naturally in a relaxed position
- Never hold the leg raised for longer than 10 to 15 seconds before allowing it to rest
- Never force the leg into a position that produces pulling away, vocalization, or muscle tension
- Always support the leg at the joint nearest to the nail being trimmed, not only at the paw
Alternatives to Dog Nail Clippers: Tools Beyond the Standard Clipper
The Complete Range of Alternatives to Dog Nail Clippers for Arthritic Dogs
Alternatives to dog nail clippers are particularly valuable for arthritic dogs because the standard scissor-action or guillotine clipper applies a compressive force to the nail during cutting that transmits as a brief but distinct pressure pulse to the toe joint. In a pain-sensitized arthritic dog, this pressure pulse is one of the primary triggers for guarding, struggling, and resistance that makes nail sessions stressful for both dog and owner. Alternatives to dog nail clippers eliminate this pressure entirely or distribute it differently, producing a more tolerable experience for many arthritic patients.
The primary alternatives to dog nail clippers in 2026 are:
Rotary nail grinders:
The electric rotary grinder removes nail material gradually through abrasion rather than the single compressive cut of a clipper. This eliminates the pressure pulse entirely, allows extremely fine material removal increments that reduce the risk of hitting the quick, and produces a smoother nail edge that does not snag on bedding or flooring. The AKC’s grinder overview identifies the vibration and sound of grinders as the primary tolerance barrier, which the desensitization protocol addresses in advance.
Scratch boards and nail files:
Scratch boards are coated boards or ramps that the dog scratches against voluntarily, removing nail material through the natural scratching motion without any human handling of the paw. Addressed in full in the dedicated scratch board section below.
Emery board and manual nail files:
Traditional emery boards or metal nail files can be used for maintenance filing between sessions, particularly for dogs whose nail growth rate is slow and whose nails remain near the correct length after a trim. Filing produces no compressive force and no sound, but is significantly more time-consuming than clipping or grinding for meaningful nail reduction.
Veterinary or professional groomer nail trimming:
For arthritic dogs whose home tolerance has broken down completely, scheduled veterinary nail trims performed with light sedation or anxiety medication are a legitimate and humane option. VCA Animal Hospitals’ veterinary nail trim guidance identifies veterinary nail trims under light sedation as a regular maintenance procedure rather than a last resort for dogs whose pain or anxiety makes unmedicated handling genuinely inhumane.
Best Dog Nail Grinder for Sensitive Paws 2026: Top-Rated Options
Selecting the Best Dog Nail Grinder for Sensitive Paws 2026
The best dog nail grinder for sensitive paws 2026 must meet specific criteria beyond the general grinder market: low vibration transmission, quiet motor operation, variable speed for reducing stimulation during tolerance building, a grinding head small enough for precise nail contact on a single nail without adjacent toe contact, and a safety guard that prevents the grinding surface from contacting paw fur or skin. Dogster’s 2026 dog nail grinder review confirms that the grinder category has significantly advanced in the last two years, with cordless, low-noise, USB-rechargeable options now available at price points that make them accessible to any budget.
Top-rated best dog nail grinder for sensitive paws 2026:
- Dremel 7350-PET: The Dremel brand is the most veterinarian-recommended grinder across professional grooming and veterinary contexts. The 7350-PET model is specifically designed for pet nail use with a 4-volt lithium battery, two speed settings (6,500 and 13,000 RPM), a diamond wheel bit, and a low weight and vibration profile that makes it genuinely manageable for single-handed nail access while the second hand supports the dog’s leg. The AKC’s grinder selection note identifies the Dremel as the industry standard for professional and at-home dog nail grinding
- Casfuy USB Rechargeable Dog Nail Grinder: The most highly rated budget-accessible option, featuring a 2-speed motor, 3 grinding head ports for different nail sizes, a protective cover that prevents fur entanglement, and a low 50-decibel noise level that is significantly quieter than most grinders and substantially below the threshold that triggers noise sensitivity in most dogs. The USB rechargeable format eliminates battery management
- Oster Gentle Paws Premium Nail Grinder: Specifically marketed for sensitive and anxious pets, this grinder’s defining feature is a noise level of 40 to 45 decibels making it among the quietest options in the category. For arthritic dogs whose noise sensitivity is a primary tolerance barrier alongside pain sensitivity, the Oster’s low noise profile makes it the most accessible best dog nail grinder for sensitive paws 2026 introduction tool
- Peticare LED Nail Grinder: Features an integrated LED light that illuminates the nail during grinding, allowing the quick (the blood vessel and nerve inside the nail) to be identified visually in dogs with translucent or light-colored nails. This quick-visibility feature reduces the risk of painful quick contact that is the most common cause of session aversion in previously conditioned dogs
Grinder technique for arthritic dogs:
Apply the grinding surface to the nail for no more than 2 to 3 seconds per contact, then withdraw and allow heat dissipation before the next contact. Prolonged grinder contact on a single nail generates frictional heat that is uncomfortable even for non-arthritic dogs. Use the lowest speed setting during the initial desensitization phase and increase speed only when the dog shows consistent tolerance at the lower setting.
Dog Scratch Pad for Nails Pros and Cons: The Passive Alternative
The Complete Dog Scratch Pad for Nails Pros and Cons Assessment
The dog scratch pad for nails pros and cons question is particularly relevant for arthritic dog owners because the scratch pad represents the only nail maintenance method that requires zero human handling of the dog’s paws, removing the pain-sensitized handling trigger entirely. The Whole Dog Journal’s scratch board overview identifies scratch pads as a genuinely effective passive nail maintenance tool for dogs trained to use them, with results best described as maintenance rather than full nail reduction.
Dog scratch pad for nails pros and cons: the complete assessment:
Pros:
- Zero paw handling required, eliminating the primary pain and anxiety trigger for arthritic dogs
- Completely dog-controlled, meaning the dog engages when comfortable and stops when it chooses
- Can be self-trained through targeting and reward, taking advantage of the natural scratching behavior most dogs already exhibit
- Addresses specifically the front nails, which receive the most direct loading in arthritic dogs with rear limb primary involvement and are therefore the most important to maintain at correct length
- Builds positive nail maintenance associations that transfer to improved tolerance of direct trimming methods over time
- Zero equipment noise or vibration
Cons:
- Addresses front nails far more effectively than rear nails, as the scratching motion that engages the scratch pad is a front-paw behavior. Rear nail maintenance still requires direct trimming for most dogs
- Produces maintenance nail length reduction rather than significant nail shortening, meaning scratch pads cannot replace trimming for a dog whose nails are already significantly overgrown
- Requires training for most dogs to use reliably, as the scratch pad is not naturally self-explanatory to dogs that do not already exhibit targeted scratch behavior
- Uneven nail wear is a common result, as dogs naturally favor certain toes during scratch pad use, producing inconsistent nail length across the front feet that may require selective direct trimming to even out
- Surface abrasive coating wears out over time and requires periodic replacement to maintain effectiveness
Building scratch pad behavior:
The Whole Dog Journal’s scratch pad training protocol identifies targeting as the most reliable training approach: place the scratch pad on the floor, lure the dog to place its front paws on the pad using a treat at nose height, then move the treat toward and over the pad surface to prompt a natural pawing motion. Mark and reward each pawing contact with the pad. Progress from rewarding any paw contact to rewarding specifically vigorous downward scratching motions across the pad surface over multiple sessions.
How to Trim Arthritic Dog Nails: The Step-by-Step Session Protocol
The Complete Step-by-Step Protocol for How to Trim Arthritic Dog Nails
How to trim arthritic dog nails during an active session requires a structured, time-limited, treat-supported approach that prioritizes the dog’s emotional and physical experience over session efficiency:
Complete session protocol:
Timing:
Schedule the session 60 to 90 minutes after the dog’s morning arthritis medication when pain relief is at peak efficacy. Avoid sessions immediately before or after meals, when the dog is fatigued from exercise, or on days when the dog has shown increased pain signals
Environment preparation:
Place a non-slip orthopedic mat at floor level in the quietest area of the home. Gather high-value treats (real chicken, cheese, or liver) in a treat pouch worn at the waist for hands-free access. Have the grinder or clipper pre-charged, the correct grinding head pre-installed, and all tools within reach so no movements away from the dog are required mid-session
Pre-session assessment:
Gently palpate each leg from shoulder to paw before beginning. Note any flinching responses that indicate higher sensitivity in specific joints today, and plan to leave those leg’s nails for a subsequent session if sensitivity is elevated
Position the dog:
Use the lateral recumbent, supported standing, or lap position as appropriate for the dog’s size and arthritis distribution, following the how to support a senior dog while clipping nails principles above
One nail at a time:
Clip or grind one nail, deliver two to three high-value treats immediately after the tool contact, release the paw completely, allow the dog to shift position if desired, then proceed to the next nail. Hills Pet’s senior dog grooming guidance identifies the individual nail treat-reward cadence as the most important single variable in maintaining arthritic dog tolerance across a multi-nail session
Session length limit:
Set a maximum of 5 minutes for the entire session regardless of how many nails are completed. For dogs in the early desensitization phase, 2 minutes is the appropriate maximum. Nail completion is secondary to the session experience; an incomplete positive session is a far better outcome than a complete session that ends in stress
Post-session reward:
Provide a special post-session treat (a longer-lasting chew or a food-stuffed Kong) immediately after the session ends, while the dog is still in the session area. This terminal reward teaches the dog that the nail session predicts a highly positive extended reward, building the positive anticipation that makes future sessions progressively easier
Frequently Asked Questions About How to Trim Arthritic Dog Nails
The best alternatives to dog nail clippers for arthritic dogs are rotary nail grinders (which eliminate the compressive pressure pulse of clipping), scratch boards (which require zero paw handling), and emery filing for maintenance between sessions. The AKC’s tool overview confirms that grinders are preferred by many professional groomers for arthritic and anxiety-prone dogs specifically because the gradual abrasion approach allows finer control and eliminates the sudden pressure application that triggers guarding responses.
The best dog nail grinder for sensitive paws 2026 is the Dremel 7350-PET for professional-grade performance and veterinarian recommendation consistency, the Oster Gentle Paws Premium for the lowest noise level in the category at 40 to 45 decibels, or the Casfuy USB Rechargeable for the best combination of budget accessibility and feature completeness. Dogster’s 2026 grinder review confirms that noise level is the most important selection criterion for sensitive arthritic dogs, as the grinder’s sound is often a more significant tolerance barrier than its vibration.
How to support a senior dog while clipping nails most safely uses lateral recumbency (side-lying on a non-slip orthopedic mat at floor level) for dogs with widespread arthritis, supported standing on a low non-slip platform for dogs with rear-primary arthritis, or a lap position for small and medium breeds. The Spruce Pets’ positioning guide confirms the critical rules: never extend the leg beyond its natural resting position, hold each leg for no longer than 10 to 15 seconds before releasing, and never force a position that produces struggling, vocalization, or muscle tension.
Your Complete Gentle Nail Care Action Plan for How to Trim Arthritic Dog Nails
How to trim arthritic dog nails consistently and comfortably requires a long-term protocol that combines behavioral conditioning, appropriate tool selection, correct positioning technique, and realistic session expectations:
- Start with a veterinary assessment: Confirm which joints are most affected by arthritis, discuss medication timing relative to nail sessions, and ask whether light sedation or anxiolytic medication is appropriate for your dog’s current pain and anxiety level
- Complete the desensitization protocol before attempting a full trim: Spend one to two weeks on paw touch conditioning and tool introduction before the first nail contact. The investment in conditioning produces compounding returns in every subsequent session across the dog’s lifetime
- Select the right tool: Choose between the Dremel 7350-PET or Oster Gentle Paws grinder based on your dog’s noise tolerance profile, or identify the alternatives to dog nail clippers best suited to your dog’s specific resistance triggers
- Implement scratch pad training in parallel: Begin scratch pad conditioning as a parallel track to direct trimming tolerance building. Even if the scratch pad only addresses front nail maintenance, reducing the direct trimming demand on the most frequently used nails reduces session frequency and total handling burden
- Maintain the one-nail-per-treat cadence and 5-minute session maximum: These two disciplines protect the session experience more effectively than any other single protocol element
- Schedule sessions at medication peak efficacy: Time every session for 60 to 90 minutes post-morning medication and reassess on high-pain days before proceeding
For continued reading, explore How to Prevent French Bulldog Breathing Problems: The Complete Health Guide 2026, Free Insulated DIY Dog House Plans: Build a Warm Safe Home for Your Dog 2026, and Best Rated Dog Food Brands 2026: The Complete Canine Nutrition Guide in our complete responsible dog ownership series.


